Fairlight is the world’s first and only audio post production software that’s completely integrated with picture editing. That means you can move between sound editing and picture editing with a single click! The Fairlight page is designed to be intuitive and easy to learn for new users, as well as powerful and extremely fast for professionals working on massive projects with over a thousand tracks. You get dozens of professional tools for recording, editing, mixing, dialog replacement, sound clean up and repair, equalization, dynamics processing, and mastering soundtracks in all standard formats from stereo and surround sound up to the latest immersive 3D audio formats!
Whether you’re a video editor using Fairlight for the first time, a ProTools user moving to DaVinci Resolve, or a sound engineer working on a massive console, the Fairlight page has everything you need! Video editors will find familiar arrow and selection tools just like on the edit page, making it easy to start learning Fairlight. If you’re coming from ProTools or another digital audio workstation, smart mouse based editing tools and customizable keyboard shortcuts let you edit sound faster than ever before. For even more speed, add the Fairlight Desktop Console or customizable 2, 3, 4 and 5 bay consoles for larger film, television and commercial projects!
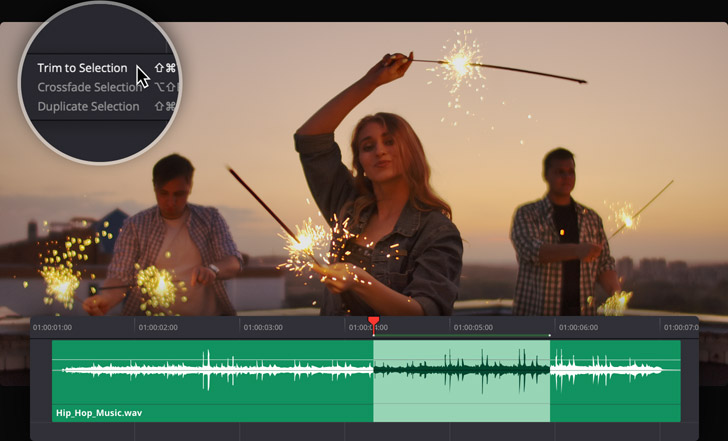
The multi function edit selection tool is designed for fast sound editing with a mouse and keyboard. It even works during live playback and recording so you can fix problems as you hear them! The edit selection tool automatically changes based on where you click so you can work faster. It combines arrow and marquee tools and gives you a new way of selecting edits. You can click the lower half of a clip to select or move it, the upper half to set an edit point, or drag a range to select it. There are dozens of new sound editing commands that you can customize with your own keyboard shortcuts. The playhead snaps to the selection, so you can start playback without manually moving the playhead!
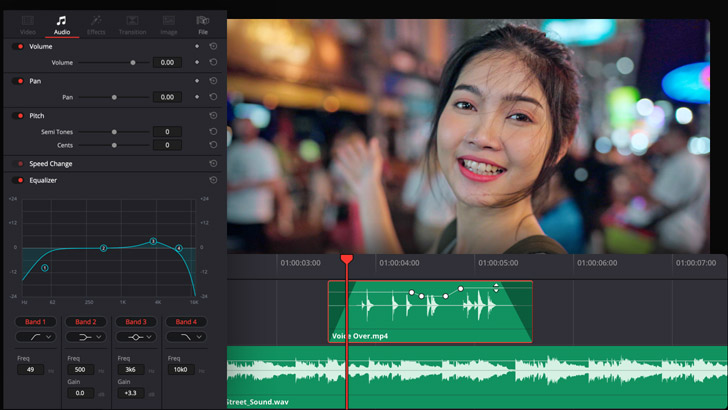
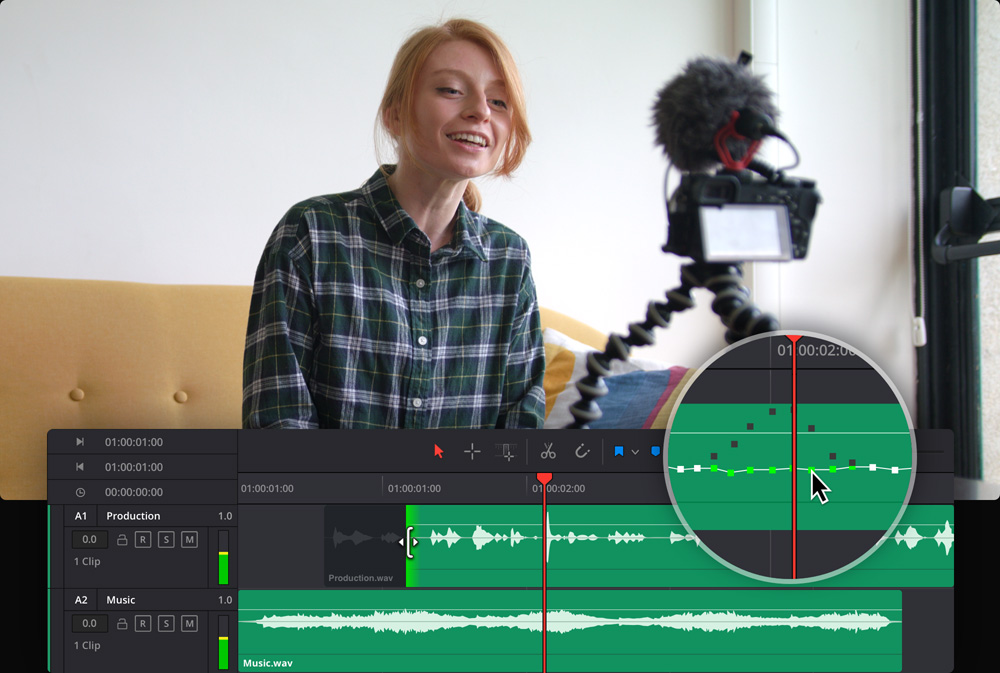
Each clip in the timeline has its own volume, pan, pitch and 4‑band parametric EQ controls. Fade handles located on the sides of clips let you quickly add fade ins and fade outs. You can also adjust clip volume by raising and lowering the level bar in the middle of the clip. To change volume over time, hold down option on your keyboard and click to add keyframes, then drag to adjust the level. The waveform will update in real time. The clip inspector also features a level slider, panner, pitch adjustment and EQ settings. Levels can also be set using the normalization command, which can be found by right clicking on a clip. This is a fast way to quickly set target levels for timeline clips.
The Fairlight audio timeline combines clip and waveform editing in a single view, so you don't have to switch to a different window for sound editing. Like the edit page, you can use the selection arrow to rearrange clips, extend or shorten them, quickly add fades and adjust levels. For waveform editing, just zoom all the the way in to see the individual audio samples! The closer in you zoom, the easier it is for you to spot clicks, pops or other problems. Once you have zoomed all the way in, the pointer becomes a pencil tool allowing you to redraw the waveform or draw a new one, and remove unwanted sounds! Changes to the waveform automatically update in real time when you zoom out.
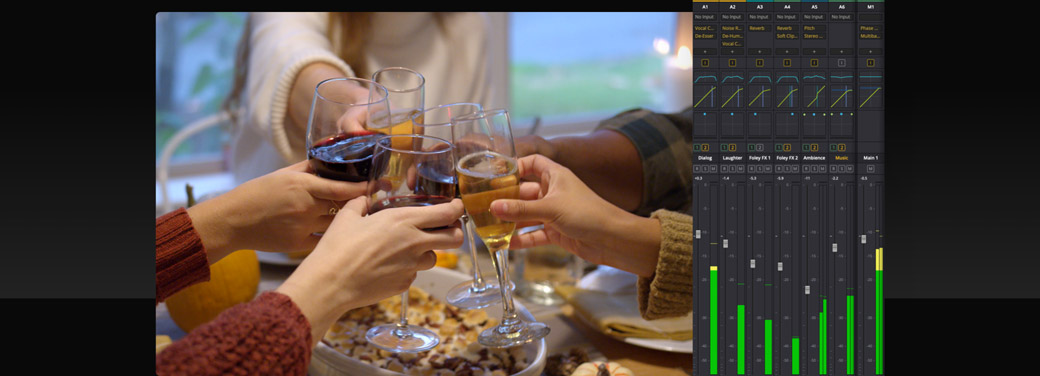
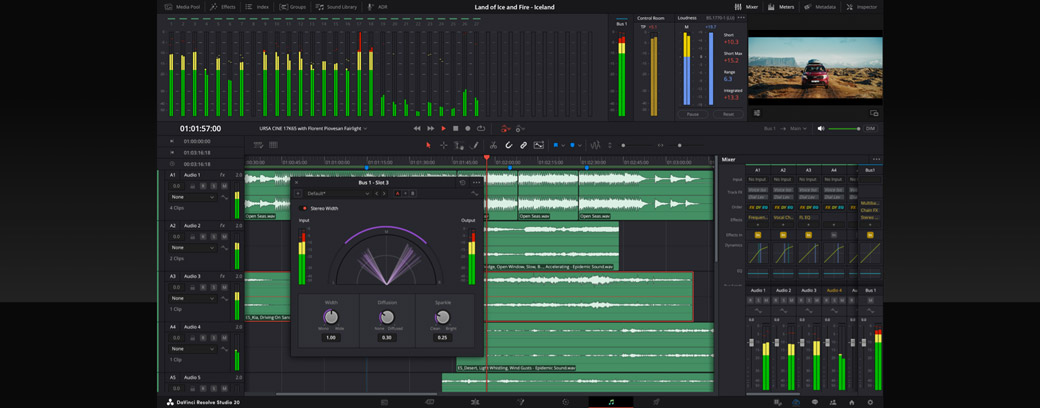
The Fairlight audio page features a professional mixer with channel strips for timeline tracks and buses. All channel strips include a fader to adjust levels, stereo and 3D panners, 6 effects slots for adding plug‑ins, along with dynamics and a 6 band parametric equalizer on every channel. Make volume changes on the fly while you mix, or record the changes over time with automation. Click the automation button in the toolbar, set the touch control to latch, and then choose the parameter you want to record from the "enable" button in the toolbar. Active faders turn red during playback while automation data is recorded and green when you have finished.
Every track includes real time equalization and dynamics processing to sweeten and fine tune your mix. This is in addition to your six real time track effects, making Fairlight far more powerful than other digital audio workstation software! Simply double click in the EQ area above any channel strip in the mixer to open the 6 band parametric equalizer. There are graphic controls and knobs for equalizing and filtering different tonal ranges. Double clicking the dynamics area will open the dynamics window which features expander, gate, compressor and limiter dynamics processing. Use the interactive controls to sweeten your tracks, save presets and even copy settings from one track to another.
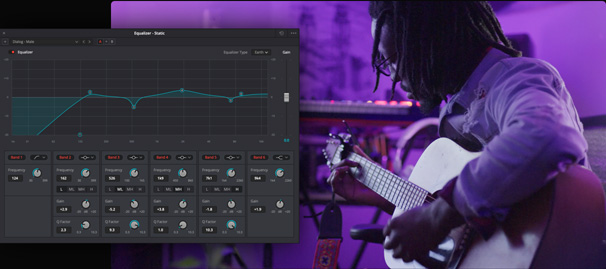
Fairlight Equalizer
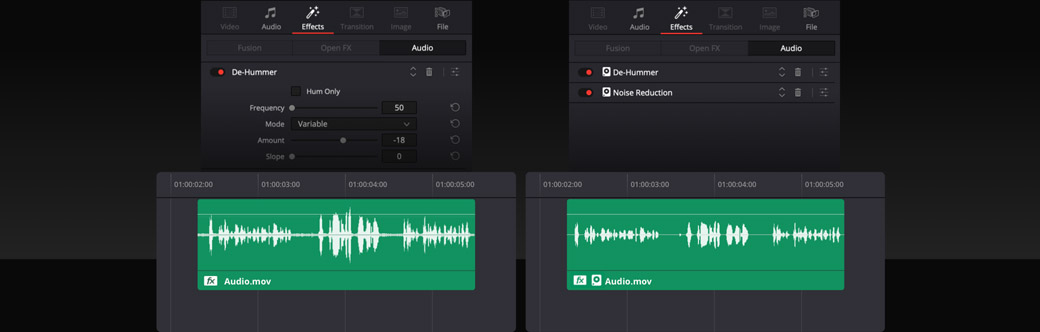
The Fairlight page includes Fairlight FX plug‑ins for cleaning up and repairing sound. Fairlight FX are located in the effects library, which opens by clicking on the icon at the top left of the screen. It contains Fairlight FX such as the de-esser to minimize annoying "s" sounds, de‑hummer to remove power line hum, noise reduction plug-ins and more. Simply drag one to a clip and its window will open for making adjustments. The noise reduction plug-in automatically detects noise in a selection. You can also teach it by selecting noise and clicking on "learn." Anything that matches the noise will be removed from the clip! You can add as many plug‑ins as you need to clips or up to six per track.
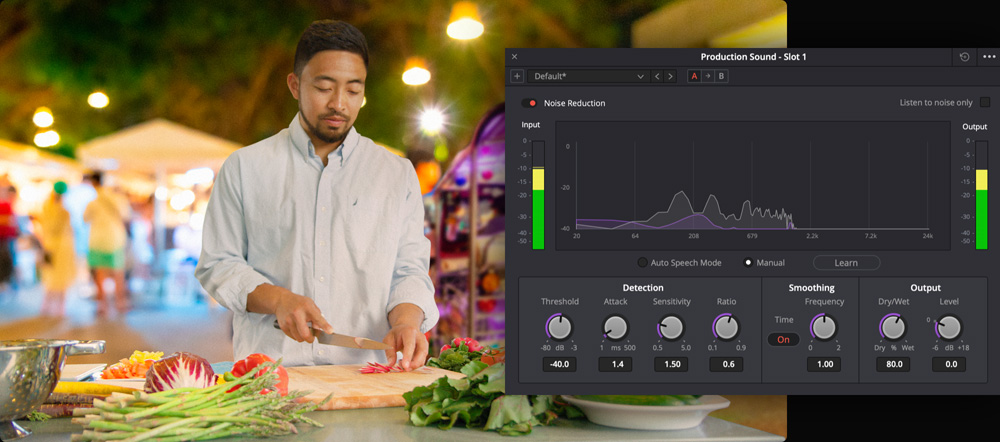
Fairlight Noise Reduction
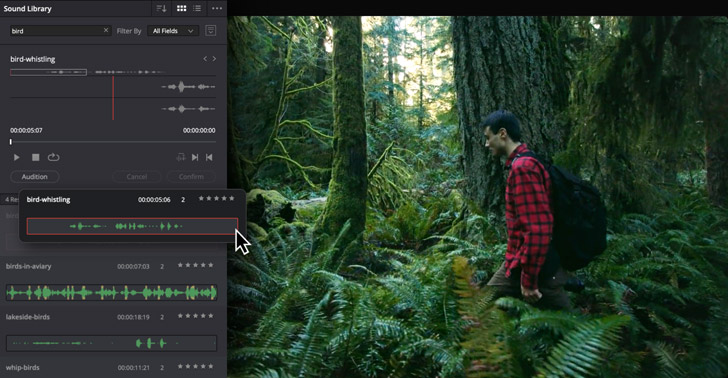
DaVinci Resolve makes it easy to access your external sound libraries right from the Fairlight audio page so you don’t have to leave the application! Click the sound library icon at the top left of the screen to open the search window, find a sound, mark the part that you want to use, and then click the audition button to try it out on your timeline. You can keep auditioning clips until you find the perfect sound. Once you have auditioned a clip in the timeline click the confirm button to keep it, or the cancel button to remove the clip and try another. There is even a sync button that lets you sync any part of the sound effect waveform to the playhead in your timeline.
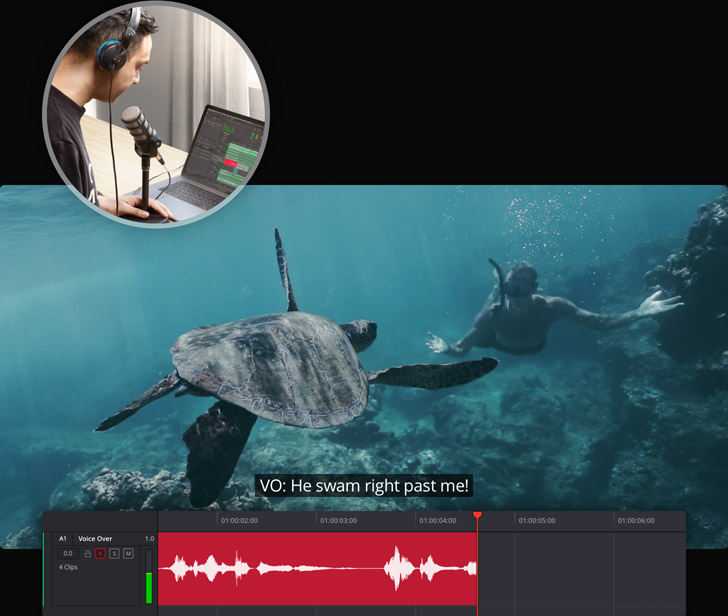
You can use the Fairlight page to record everything from a simple voice over to a complete symphony orchestra! To start, click on a track’s input button at the top of the mixer and select input from the drop down menu. Next, choose the microphone or input device you want to use and click "patch." Arm the track for recording by clicking the "R" button on the track header or in the mixer, then click the record button on the toolbar. Press the spacebar to stop recording when you’re finished. The new recording is added to the timeline on the selected track. If you record additional takes, they’ll be put in different layers on the same track. You can show audio track layers from the view menu.
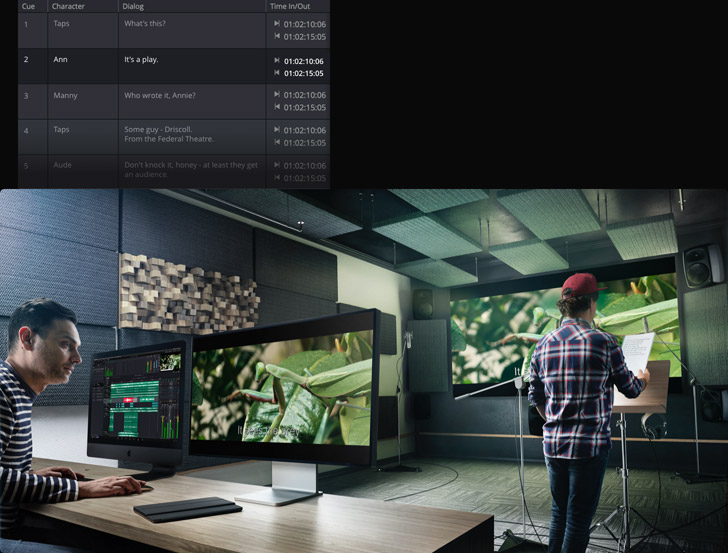
Film and television dialog is often re-recorded in the studio after the shoot. Sometimes on set recordings are noisy or unclear, or the Director may want a better performance from the actor. Fairlight includes professional automatic dialog replacement tools, known as ADR, so you don’t have to use another application. Click on ADR at the top of the screen, then use the set up panel to configure recording and visual cue options such as beeps, countdown, text prompts and streamers. Create cues on the "list" tab with character names, dialog and more. Finally, switch to the "record" tab, select a cue and start recording. You can record multiple takes, as well as mark and rate your favorites.
Elastic wave retiming makes it possible to stretch a clip’s length in the timeline without changing pitch so you can easily retime voiceover or sound effects to match the picture. Elastic wave retiming can also be used to synchronize ADR takes with video takes for perfect lip sync of dialog with picture. Right click a clip and choose elastic wave to show the retiming controls. Drag the right edge of a clip to stretch the entire waveform or command click to add keyframes and adjust individual sections. Command dragging a keyframe keeps its position in place while stretching the waveform next to it. However most importantly, the pitch of your audio won’t be changed!

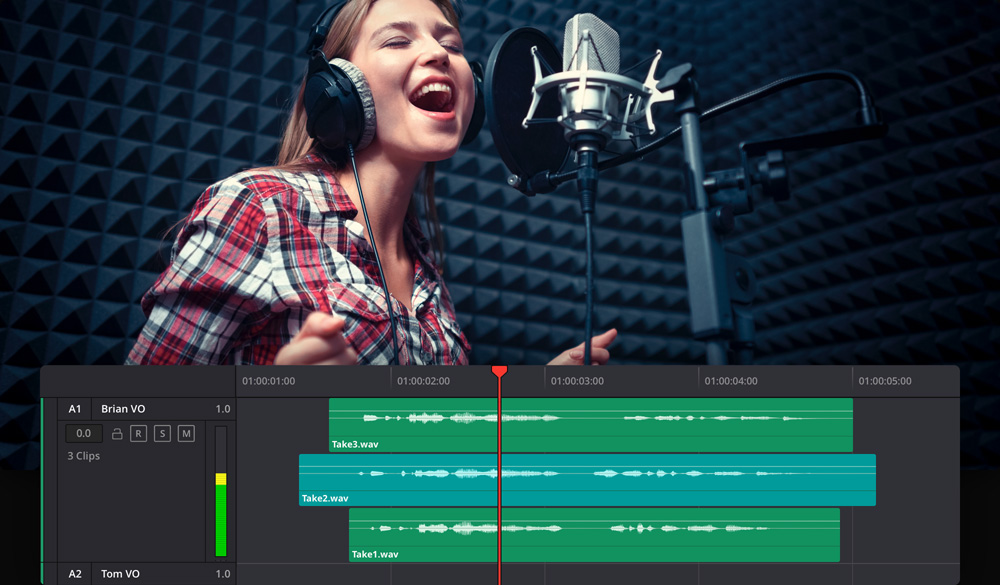
Audio layers make it easy to mix phrases from different takes into a single seamless sentence. Select "show audio track layers" from the view menu to turn them on. You can quickly split takes and arrange the best sections on the top layer, add crossfades and build a composite. Use track layers to replace words or phrases from one take with another. When you drag a layer, you’ll see a translucent "ghost" of the waveform, so it’s easy to perfectly align the layer. Layers can be used to create alternate versions on a track. This can be anything from different sound effect options, music cuts, or dialog takes. Audio layers give you a non-destructive way to try different combinations of sounds!
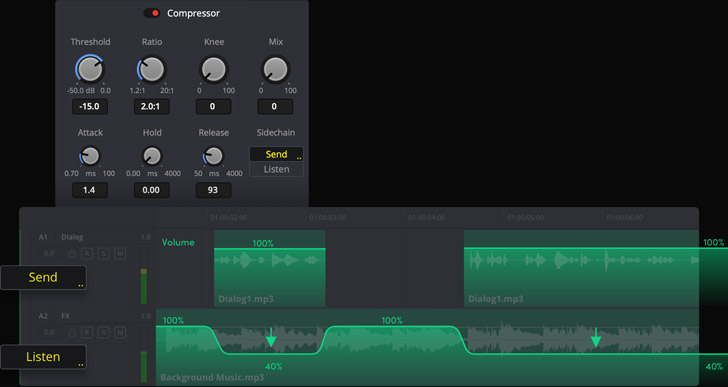
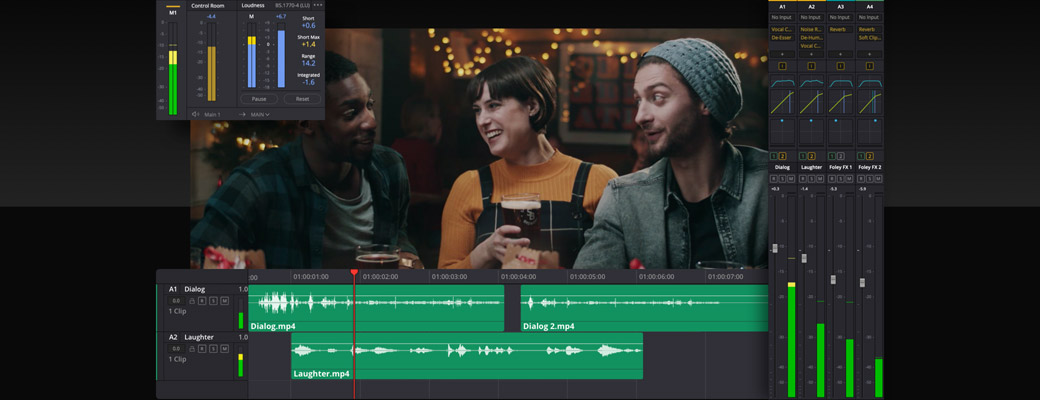
Ducking is when the volume of a music track is lowered during dialogue and raised when it ends. Fairlight automates ducking with sidechain compression, which is a process that uses the signal from one track to automatically control the amount of volume reduction on another. That means one track listens to the volume of the other and adjusts according to the rules you set up. Just open the dynamics window for the dialogue track, enable compression controls and choose "send." Select the music track, enable compression and choose "listen." Adjusting the threshold and ratio changes the amount reduced based on the dialogue’s volume. Now whenever there’s dialogue the music is automatically turned down!
Foley sounds, such as footsteps, the rustle of clothing or the handling of objects in a scene, breathe life into soundtracks as characters interact with their on screen world. The Fairlight page offers several ways to add foley to your timeline. You can install the Fairlight Sound Library and edit foley sound effects directly to the timeline. Another option is to even record original content directly to a track using the automatic dialog replacement or ADR tool to set up various cues. Finally, for DaVinci Resolve Studio users, you can use the foley sampler plug‑in. The foley sampler lets you assign sounds to keyboards or drum pads and "perform" them in realtime while watching the video.

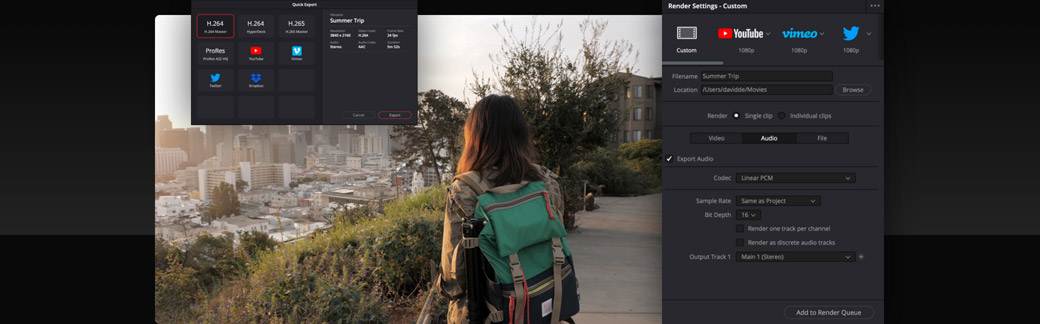
When you’re ready to deliver a soundtrack, there are numerous options to meet your needs. To export the finished video with a simple stereo mix, switch to the edit page and use the quick export option in the file menu. For more delivery options, go to the deliver page where you’ll find a variety of render presets ranging from a custom video clip, to rendering audio only files. Use the Audio Settings to select the audio format, buses and tracks you want to render. DaVinci Resolve with Fairlight gives you incredibly rich mastering and sound finishing options. You can output everything from mono and stereo to immersive 5.1, 7.1, 22.2 and even the latest 3D audio formats, all from within the same project!
The Fairlight audio page features hundreds of professional tools for audio post production in a familiar, intuitive interface that’s designed for speed and completely integrated with picture editing. Once you're ready to go beyond the basics, you’ll find advanced sync tools, immersive 3D mixing and mastering, third party plug‑in support, bouncing, loudness monitoring, full automation, customization options and much more. Fairlight is the only digital audio workstation software with a modern, super low latency audio engine capable of handling massive numbers of tracks, advanced bussing to simplify mixing, easy channel mapping options and multi format mastering in the same project.

Fairlight Audio Core is a high performance, next generation audio engine which lets you work with more tracks and realtime effects than any other system. It’s a completely scalable, hybrid engine that supports the latest multi core and multi threaded processors, as well as the Fairlight Audio Accelerator card for even more performance! Fairlight Audio Core works by distributing the workload across your system’s cores, threads and audio cards. For example, it might use the accelerator card for mixing and the CPU for plug‑in processing. Fairlight Audio Core is an extremely low latency, next generation audio engine that intelligently manages workloads, applying processing power where needed.

The combination of DaVinci Resolve with Fairlight Audio Core and the Fairlight Audio Accelerator card lets you have up to 2,000 tracks, complete with realtime effects, all on a single system! That means sound elements can be split into as many tracks as needed without introducing unwanted latency. You get Fairlight’s built in 6‑band parametric EQ and dynamics processing plus six realtime plug-ins on every track. This is a revolutionary change for larger projects as previous systems required multiple "slave" computers to process different parts of a project and be synchronized for playback. Now, with DaVinci Resolve, it can all be done on a single system!
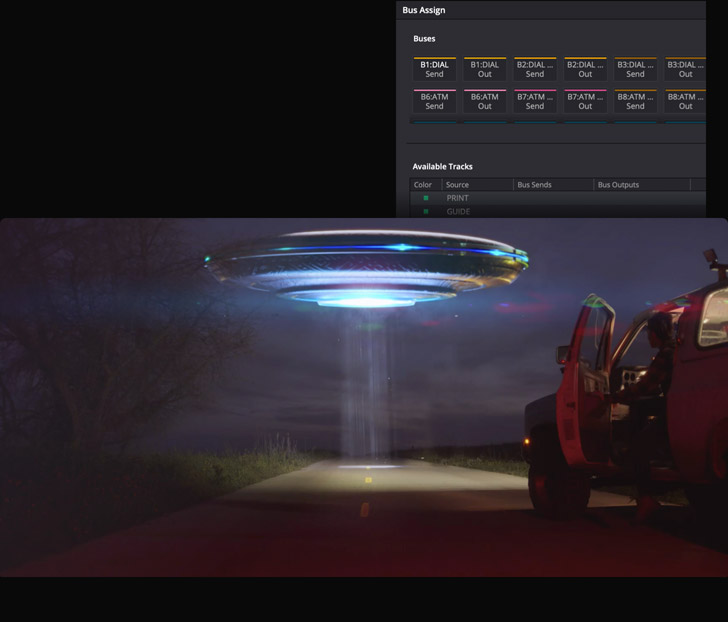
FlexBus is a new and incredibly flexible audio busing and routing system. Instead of fixed aux, sub and main buses, FlexBus gives you multi purpose, 26 channel wide buses that allow every track to send post fader information to as many as 20 other buses, 10 of which have independent level control. In addition to tracks, buses themselves can be sent to 20 additional buses, 10 of which can have level control. You can manage high track counts and extensive plug‑in processing on all of your channels and buses. FlexBus allows you to create massive projects with support for cascade style busing, extensive plug‑in processing, perfect synchronization and multiple deliveries from a single project.
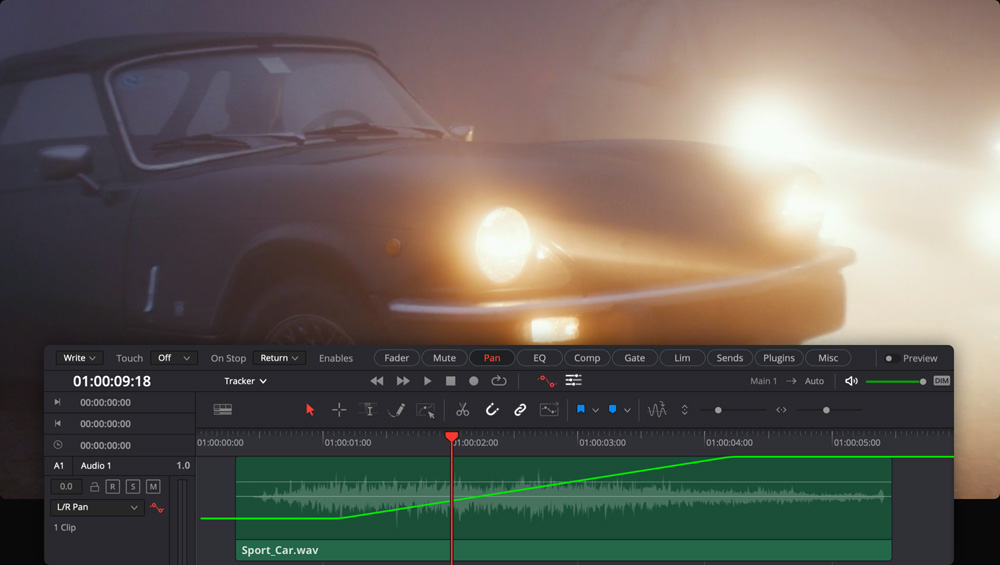
Automation tools let you record changes to virtually any control setting or effect over time so they adjust automatically during playback. Click the automation icon in the tool bar to display the controls, choose your settings, and enable the parameters you’d like to automate. Track headers feature a drop down menu for showing different parameter curves in the timeline so you can edit automation graphically. The Fairlight menu has additional options for editing automation. Use the preview button in the toolbar to try out new automation without writing the data, then turn it off to commit the changes. You can also view main and bus tracks in the timeline and graphically edit their automation data too!
There are three ways to monitor loudness while you’re mixing. Loudness meters located at the right side of the monitoring panel let you quickly assess program loudness. Just click the options menu to choose your preferred metering standard. The meters are color coded, blue if levels meet the selected standard, yellow for tolerance and red when levels exceed tolerance. There’s also a loudness graph for the main bus in the timeline when automaton controls are active. The loudness graph updates live during playback, so you’ll know exactly where the issues are so you can correct them as needed! Additionally, right click any clip to use the new "analyze audio level" offline loudness analysis.
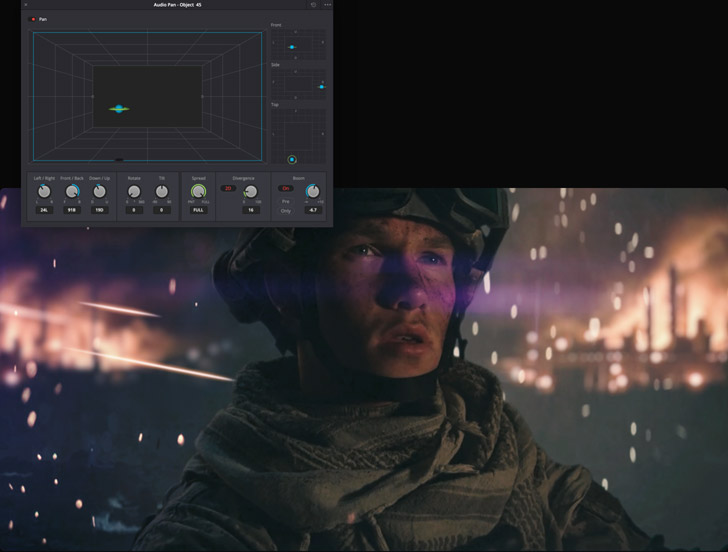
DaVinci Resolve Studio lets you mix and master immersive 3D audio soundtracks in the latest 3D audio formats. To get started, choose a 3D audio format in the Fairlight section of project preferences. Once you create new tracks and buses, option double click the pan area in the mixer to open the 3D panner. This allows you to create flying sound objects by placing sounds and applying automation in 3D space. Use the space view scope to visualize the placement of multiple sounds in your mix at the same time. Show levels on active tracks as labeled objects move dynamically as they are panned. There are even B‑Chain controls for setting up and connecting to 3D speaker systems for monitoring.
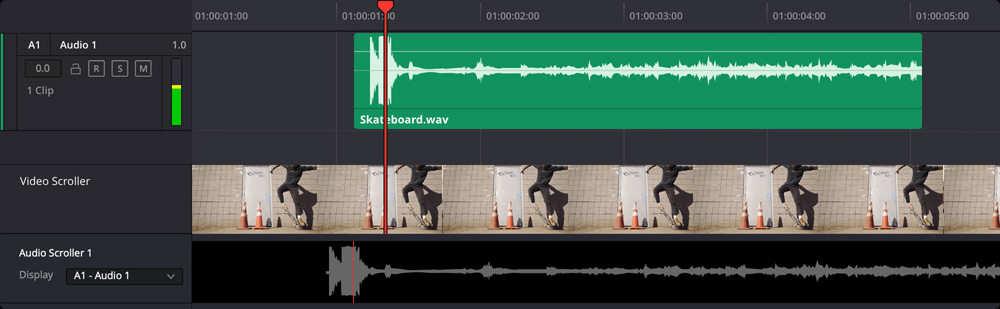
The Fairlight page features unique video and audio scrollers that help you precisely sync sound with picture. Click on the timeline view options menu in the toolbar and then select the audio and video scrollers to turn them on. You’ll see a scrolling filmstrip and audio waveforms at the bottom of the screen. These let you compare individual video frames and waveforms at the same time so you can perfectly align them. Simply drag the scrollers or double click any frame in the filmstrip to move the playhead to that frame. Then move the audio clip in the timeline to the playhead location to sync the sound with video. Scrollers are powerful tools that you won’t find on any other system!
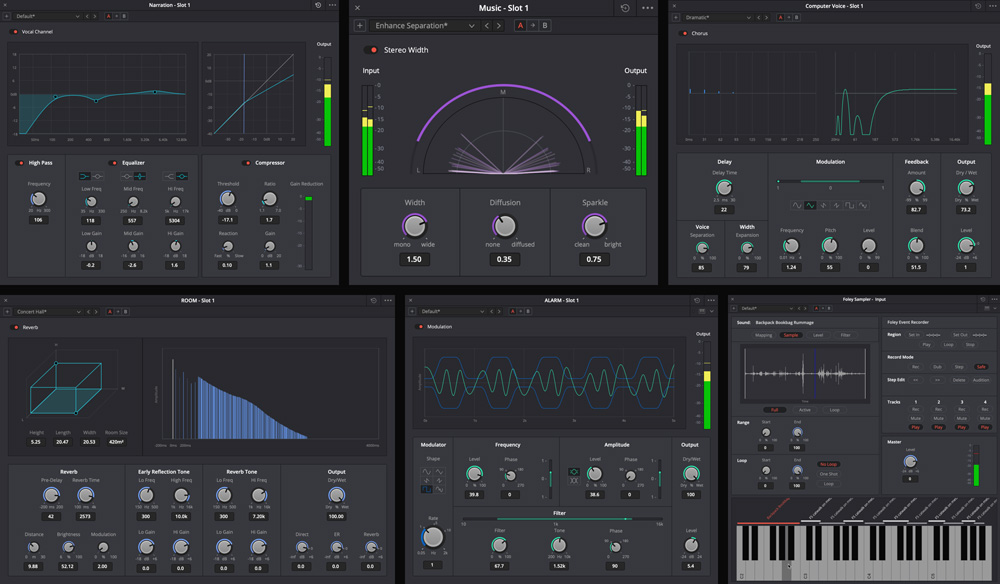
DaVinci Resolve includes over 20 Fairlight FX plug‑ins for audio repair, creative sound design and mixing. You can also add third party VST plug‑ins and Mac audio units. When you drag and drop one to a clip or track, its custom interface window will open so you can adjust its settings. Multiple plug-ins can be added to a clip, you can copy and paste effects between clips or tracks, and even save an entire effects chain in the presets library for use in other projects. Plug‑ins are processed in order from top to bottom. You can delete, open and reorder them in the inspector. If processor heavy plug‑ins are affecting playback, simply right click and select from the cache or bounce options.
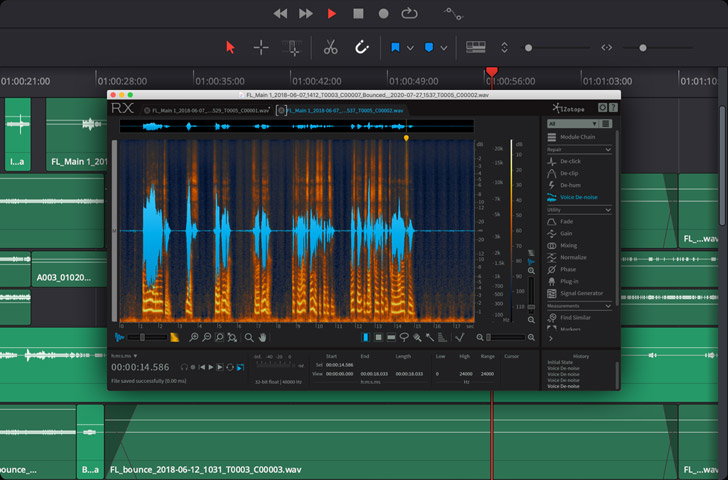
For even more creative options, you can use external audio processing applications, such as Izotope RX, without leaving the Fairlight timeline! To get started, open preferences, click on audio plug-ins, and add your audio application at the bottom of the window. Once you’ve done that, right-click on any clip in the timeline, select external audio process and choose the application you want to use. A new bounced version of the clip opens in the external application. Use the external app as you normally would and save the clip when you’re done. When you do, the edited clip is added to a new layer above the original on the timeline. This gives you an easy way to restore the original if needed.
The Fairlight audio page offers a variety of bounce options for quickly rendering audio as you work. This lets you improve playback performance by "bouncing" processor intensive clips and tracks, consolidating tracks, or generating finished audio files. Simply right click on a clip and select either bounce audio effects or bounce clips to files. "Bounce clips to files" opens a dialog where you can enter a clip name, tags, change the clip format, and choose a destination for the rendered file. You can also bounce selected tracks to a new layer or bounce a mix to a track. Bouncing a mix will always result in a channel configuration that matches the source bus.
Audio Clip With Fairlight FX
Cached Clip
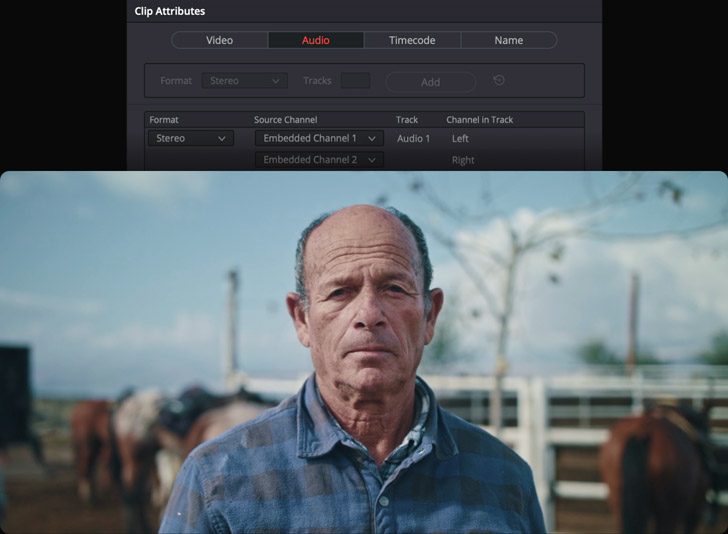
Fairlight gives you the flexibility to change clip and track channel mapping at anytime. This is incredibly important when dealing with multiple microphone sources, to eliminate an unwanted channel, or to isolate dialogue from a 5.1 or 7.1 multichannel clip. In addition, you can also use "adaptive" tracks for non standard formats with support for up to 24 channels per clip or track. No matter how many sources you sync to your clips, they will playback seamlessly and can be edited to a single multi channel track or separate mono tracks. Track format can be changed by right clicking on the track header. Clip format can be changed by right clicking on the clip and changing clip attributes.
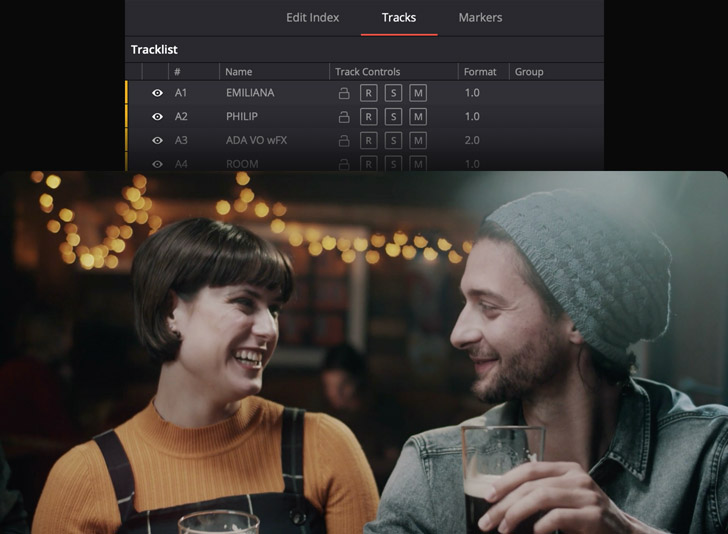
Fairlight’s multi purpose index panel offers detailed interactive lists of the clips in your timeline, along with tracks and markers, letting you instantly navigate to specific elements. You can use the index to locate clips, quickly change track states, and even create spotting lists with markers. In list view, the markers index shows each timeline marker as an icon, along with notes and description columns for creating a detailed spotting list. The track index lets you quickly select or toggle track states such as lock, arm, solo and mute with a swipe of the mouse. You can also rename tracks, show or hide visibility in the timeline and mixer, and even drag to reorder tracks!